Showing posts with label sewing. Show all posts

Apr 14, 2012

New Look 6922 and a Wadder

This is one of those posts that should've been written... oh, say, a year ago? Oops.

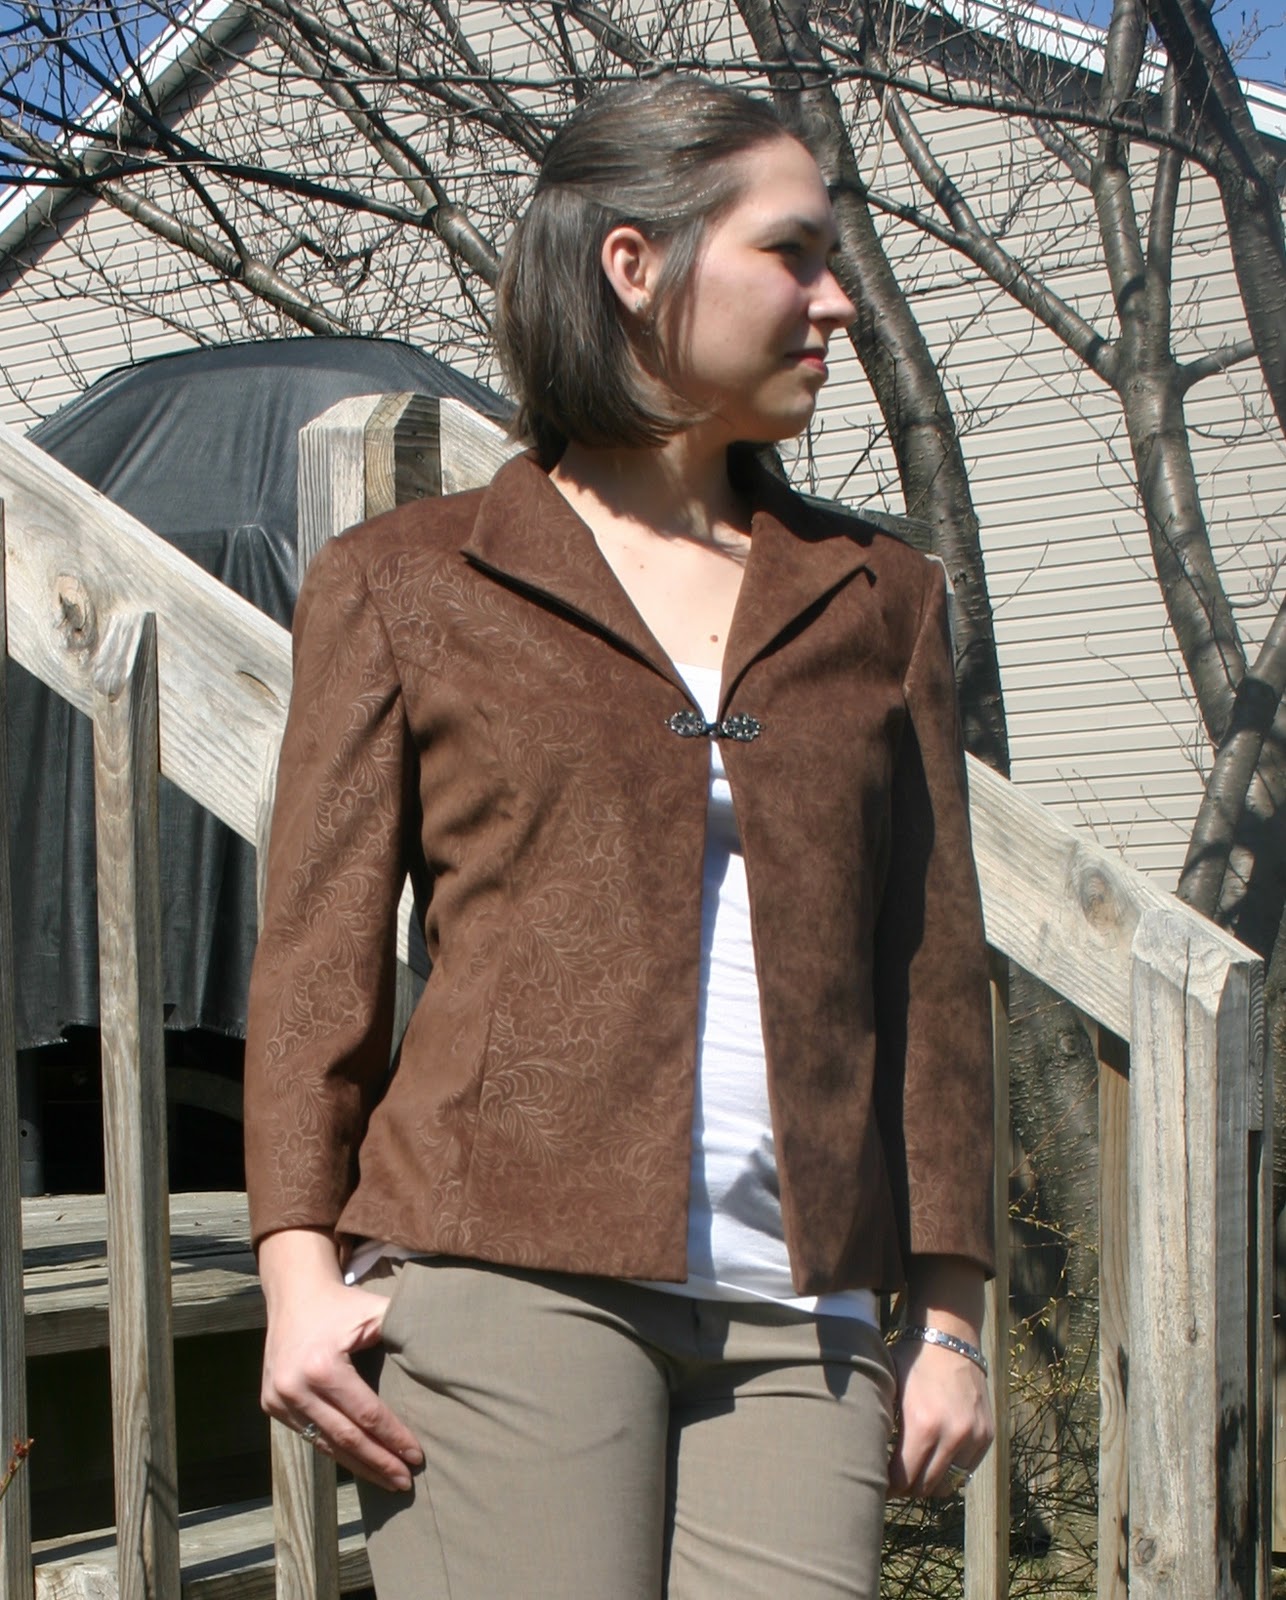
I've made the top from New Look 6922 twice, now. It's quickly becoming a TNT for a 3/4 sleeve knit top. I have one in green and one in white, both of which I wear endlessly in the spring and fall. They are perfect on their own or for layering. (I haven't blogged about either top, but  I am wearing it under this jacket)

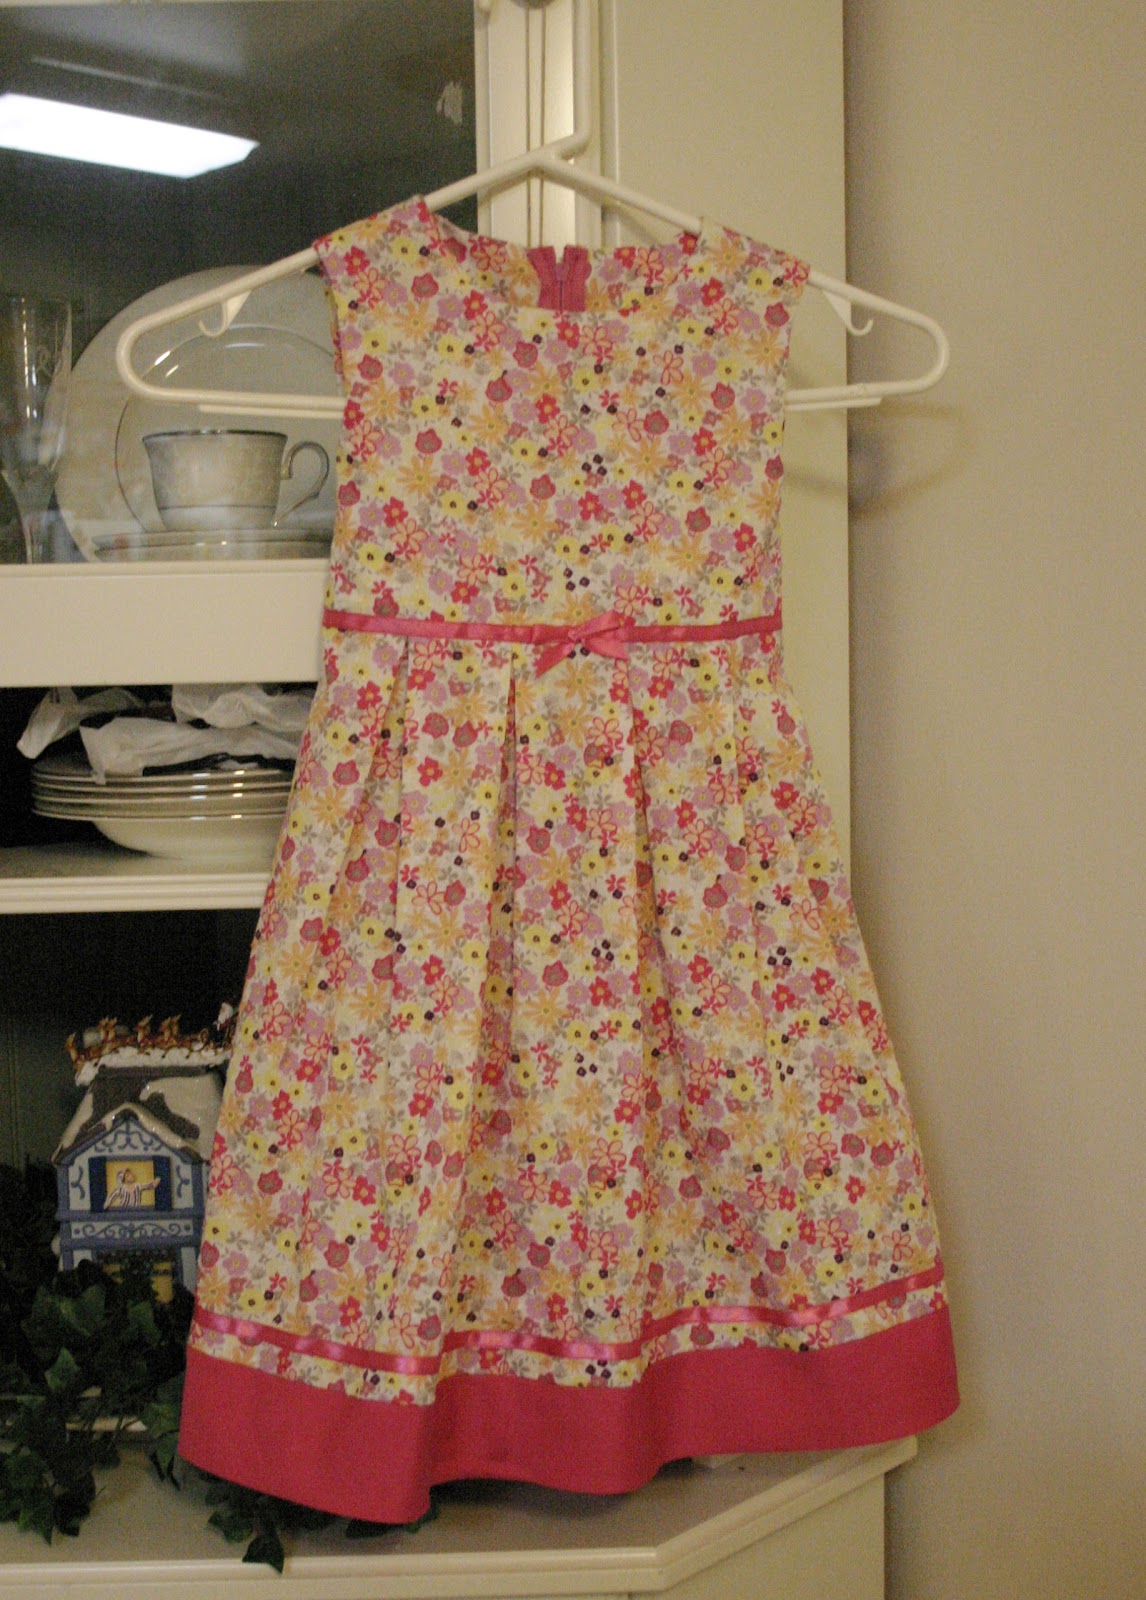
 Last year, when I went away to my Scrap & Sew girls' weekend away, I made the short-sleeved dress option.

The dress itself is very simple. It's only two pattern pieces with a neckband. The front neckline is slightly gathered, but otherwise there's really nothing to it.  This one is made in a floral print matte jersey, which is so soft and silky feeling that I love wearing it. It is a synthetic, so it's breathability is not ideal for very humid days. But since I was wearing it indoors, primarily to work or church, it was never an issue.


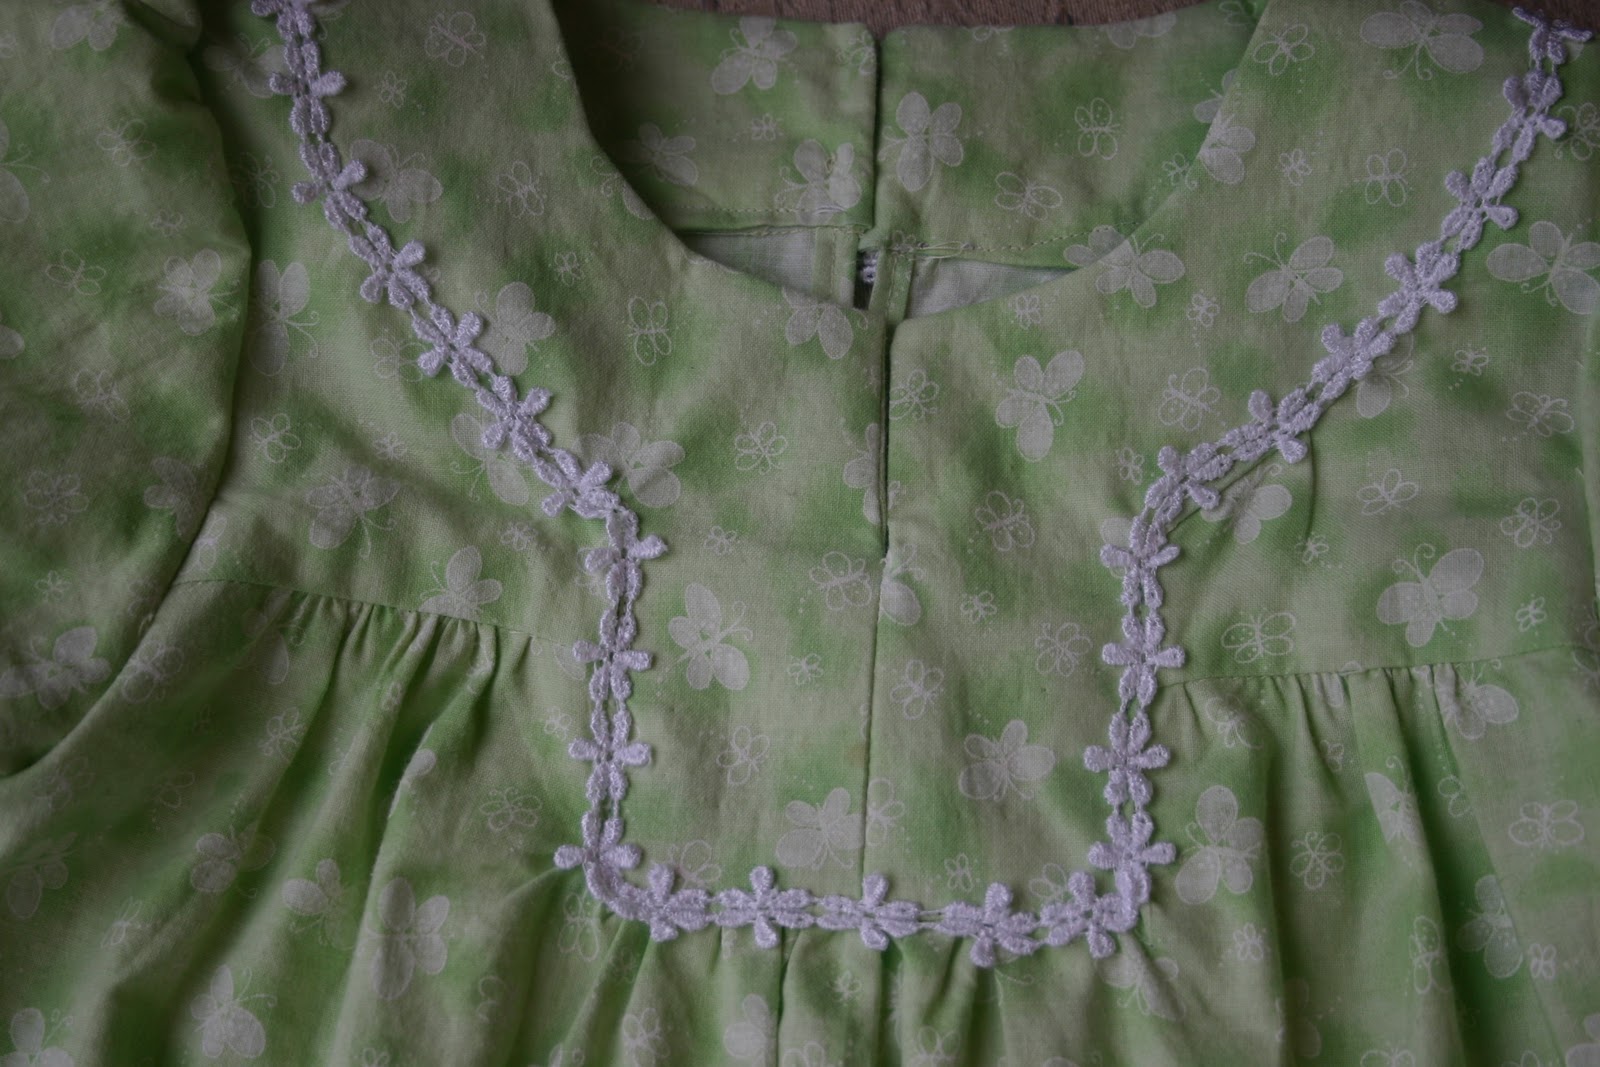
I have only two very minor issues with the dress. One is the faded fold line right down the front of the skirt. Everyone to whom I've pointed this out says it's not noticeable, so I guess I'll take that at face value and not worry too much about it. The other slight issue is the just-wonky-enough placement of the flowers on the chest. They aren't straight-up 'boob flowers' but since they're off kilter, I feel like that might be worse. It doesn't stop me from wearing it, at any rate. 

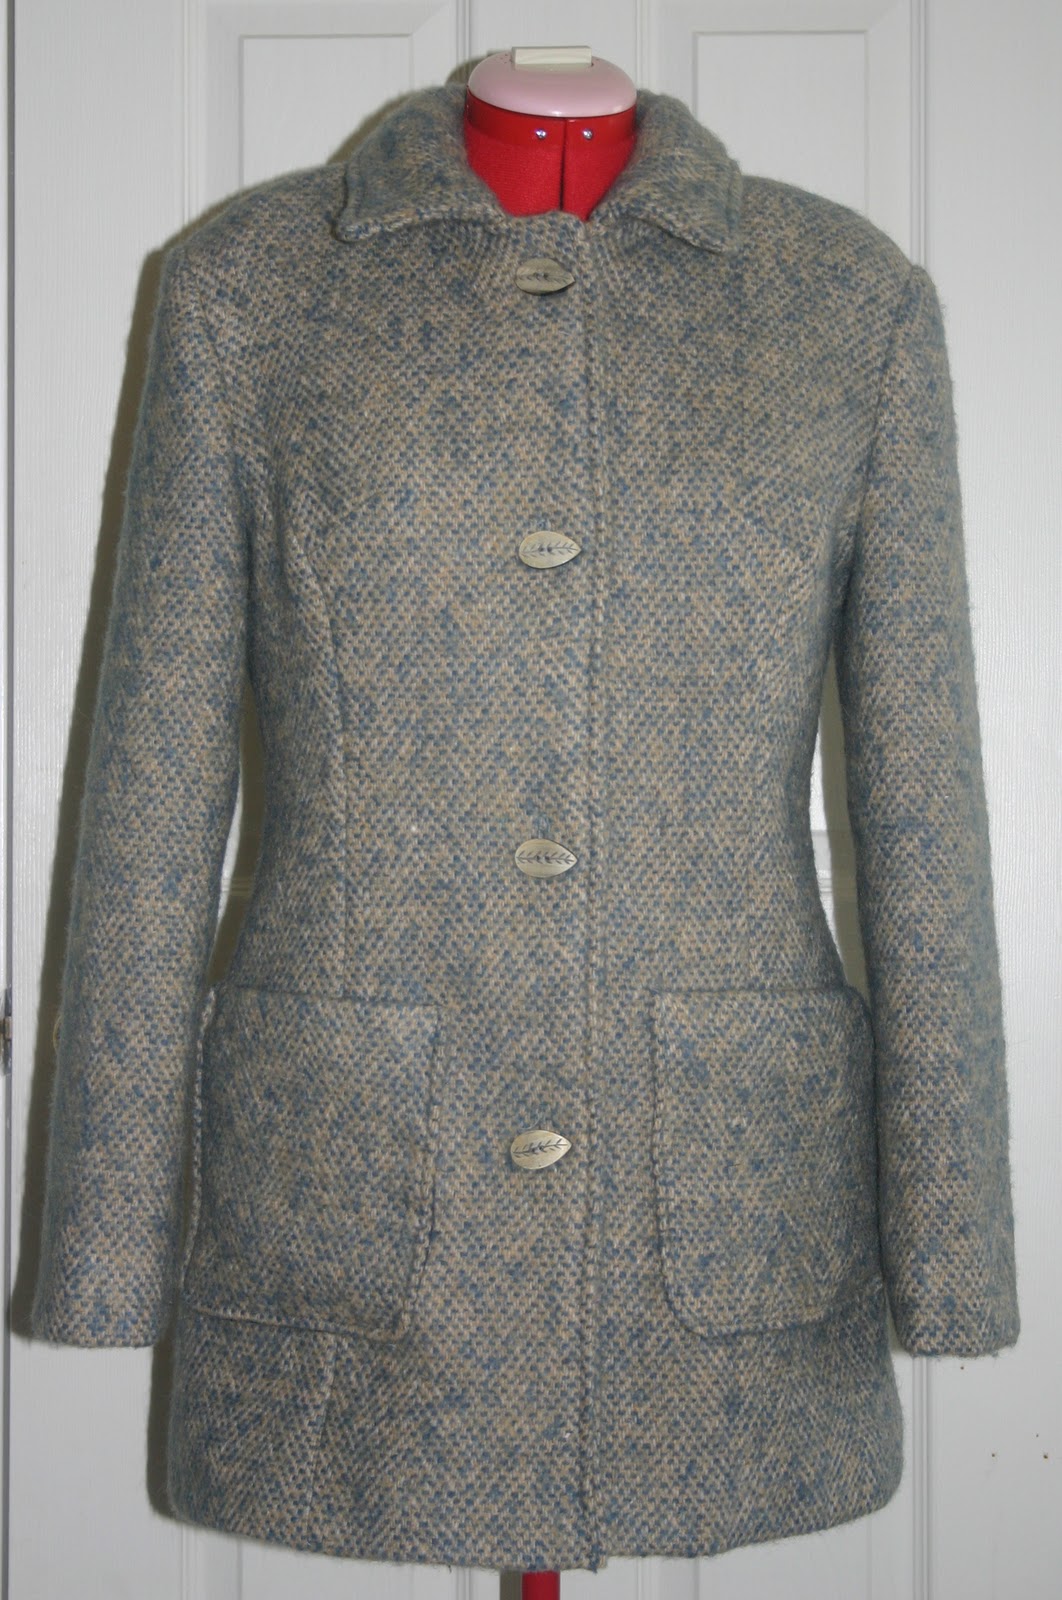
The same weekend, I made a Vogue 8593 in a heather grey wool jersey, just like on the pattern envelope. 


Man, I loved that look. Sadly, it was a horrendous mess that didn't fit anywhere. Too tight in the hips, too big on top due to the strange way those pleats lay, facings all bunched up and pulling in weird ways... it was just a complete wadder. Sad, but true. 

So, yeah. I have another New Look top planned in navy and probably another one of those super comfy dresses for after baby girl arrives this summer. I'll need a few loose-fitting but stylish dresses to wear while I'm 'recovering my shape', so to speak. Hopefully, it won't take me a whole year to post them, if I do. :)

Mar 26, 2012

Scrap & Sew Weekend

First of all, THIS amazing house in Deep Creek, Maryland is where I spent the weekend with a fantastic bunch of ladies for our annual Scrap &Sew Weekend. 


Amazing, right? This is the second year we've rented the same house, which comfortably sleeps 12 (although there were only 9 of us this year) simply because it's gorgeous. And there's plenty of comfy couch room and table space to spread out.


It's a weekend away for us ladies to do whatever crafty thing we want. Some of us scrapbook, some quilt, some cross-stitch, some read, some sew, and some just sit around and enjoy the view, the hot tub and the conversation. 

Since I'm rather limited in what I can sew for myself, currently (although I'm working on a few things to remedy that!) I chose to spend my weekend sewing for my girls. And since Easter is quickly approaching, I seized the opportunity. I had this Simplicity pattern - 7113 - in my stash, thanks to a good friend's generosity. When I showed it to Lilly, she immediately gravitated to the pink and white polka dot line drawing. "I want that one!" she told me. I asked her what colors she would like, and she just looked at me like I was crazy and repeated that she wanted that dress. 


So, I headed to our local Joann Fabrics (my only real choice for fabrics on the fly) with my fingers crossed that I could come up with something close enough. To my astonishment, I found a white Swiss dot cotton with pink polka dots for the top and washed the crap out of some pink with white polka dot quilting cotton for the bottom. A little pink ribbon for the sash trim et viola!


I arrived at the cottage on Friday evening at about 8 PM and by Saturday around noon I'd finished the first dress (albeit unhemmed). I finished the second one by that night. It definitely helped that I had cut all my pattern pieces a few days before the trip, to speed up the process.


Pardon my less than perfect photography - I was using my phone's camera. I still have to hem both of them, but after I got home Sunday evening the littlest girl woke up sick, and her big sister followed suit this morning. Both are feeling much better now, and I'm just praying I don't get whatever it was.

No matter what chaos I returned home to, it was a lovely and productive weekend away. I'm already looking forward to next March when I get to do it again. :)


Mar 22, 2012

Better Late Than Never

Well, it seems I have a bit of sewing-for-myself downtime.  It happens when you're pregnant and can't fit into anything you might want to make. *sigh*  So, I thought that in the meantime, I could get caught up on some of the posts I should have already written.

I made these dresses for my girls as Christmas gifts. Each of my daughters has a very different personality, so I wanted to choose something that they would love and know was made especially for them.

I made Lilly's dress first. It's made out of a really cute lightweight cotton print I found at Joann Fabrics. The bottom band is just a matching color broadcloth. Only the bodice is lined and I finished the seams just by pinking.

New Look 6927

I made Evie's out of an adorable narrow wale corduroy that I found it two contrasting colorways. I may make another dress for her out of the other color after she outgrows this one. I don't think she needs two dresses in such a distinct print at the same time. But I loved how this turned out.
New Look 6016

There is a very plain knit shirt pattern included with NL 6016, so I made one to go under each of the dresses.  Both were made out of a super soft rayon knit jersey; Lilly's was made in ivory and Evie's in chocolate brown. 

Christmas day action shot. :)
I have a few more things to post, which hopefully I'll get to this week. I'm going away for the weekend for an annual "Scrap & Sew" getaway weekend in Deep Creek Lake, MD. I went last year and made two dresses - one of which I wore constantly BB (Before Bump) and one that was a horrible wadder. I'll share them both and hopefully have some cute new things to show from this weekend. I have big plans for Simplicity 7113 in pink and white polka dots, for the girls' Easter dresses.

I'm going to try and take a few lessons from Miriam over at Mad Mim. She did some amazing things in her 'Sewing for a Belly' posts last year. I shall study hard and make you proud! Also, I won an amazing vintage maternity pattern giveaway from Mikhaela over at Polka Dot Overload a month or so ago. I might give one of those a try while I'm away this weekend, if I have the extra time. * fingers crossed *

And as a parting shot - here's me, about three weeks ago.

Baby Belly at 15 weeks, 6 days. Trust me, it's bigger now!


Sep 14, 2011

Snuggly Things for Small People

Every now and then my attention shifts from garment sewing to something crafty. Most often, when I get in a crafty mood, it's to make something for my kids. A few months ago, after a particularly fierce battle over the only character print pillowcase in the house, I decided to make them each their own special pillowcase. We trotted over to Jo-Ann Fabrics and they picked out a print. Lilly chose princesses (to no one's surprise) and Evie chose Mickey Mouse (her current unconditional love).


I made my own pattern, if you can even call it that. I measured a 20" by 33" rectangle on the fold, sewed one short side over itself by 3" for the 'facing', and closed the other two with French seams so there would be no frays. Both pillowcases took me an hour and a half total to finish. And, boy, are they loved.

Evie won't go anywhere without 'Mickey' - including naptime, bedtime, the minivan, the swingset in the backyard, the beach... :)  It's nice to be appreciated.

Yesterday, as I was considering fabrics for the Colette Patterns Fall Palette Challenge (PS - That's MY moodboard featured! What an honor!), my thoughts drifted to the cooling weather. I got another kid-crafty idea and took the girls to Jo-Ann again. This time, they each picked out a yard of their favorite character fleece (Minnie Mouse and Angelina Ballerina). a few snips around 3 sides and a no-sew finish (I just tied knots in the fringes) gave them each a new snuggly, comfy blanket to help guard against the new chill in the evening air. And something else to tote around the yard.

Sep 2, 2011

Fall Palette Challenge Inspirations

I'm thinking of throwing my hat in the ring for the Colette Patterns Fall Palette Challenge 2011.  My sewing time is usually fairly scant (I have 2 kids under 5) but it seems like, recently, I've been getting a bit more accomplished. I guess time will tell if I have enough time and energy to actually complete the challenge, but I've been creating an inspiration board anyway.


Color palette by COLOURlovers and Inspiration Board by Pinterest

Clockwise from upper left corner:
Navy ensemble: Note To Self Blog via Eat & Love
Buttons: Design Work Life
Green Dress with navy sash: Anthropologie
Grey, green, ivory suit: via Abby Daigle
Grey flower: French Vanilla Home Blog
Navy polka dot top: Anthropologie
Green shoes: via Maria G
Yellow heel: heels.com
Green & ivory ensemble: Tulips and Flight Suits via Talbots
Blue shoes: Chie Mihara

I guess I need to start looking for patterns and then some fabrics! So much to do! Anyone else thinking of joining the Challenge? I can't wait to see all of your inspiration boards, too!

Aug 29, 2011

Vogue 1241 - Kay Unger Dress

It seems like ages since I've finished anything, and in reality, it sort of has been. The last time I sewed was March. *shakes head*  I can barely believe it, myself. I guess I just wasn't in the mood. And I was finding other things to occupy my time. I discovered digital scrapbooking, and for a solid month it dominated most of my spare time. And let's face it, with a 2 and 4-year-old in the house, 'spare time' is quite sparse. 

Vogue 1241 - Kay Unger
But, at long last, my mojo returned and I set to work on this newer Vogue pattern. I thought this would be a perfect dress to wear to a wedding in September, in which my husband is the Best Man.

It looks like it should be fairly complicated. It is a designer pattern, and it has several interesting design features. The pleated neckline, the rouching on the front and back princess seams, square seaming, invisible zipper, full lining. Maybe it's actually relatively simple, maybe the directions are really good, or maybe I'm just getting a lot more comfortable in my sewing skills, but this went together like a breeze. I was fairly confident that I would get through the entire thing without a single unpicked seam until I accidentally sewed to the bottom of the center back seam, eliminating the kick vent. Oops. Minor, though, and easily fixed so I'm considering this a complete success anyway. :) 


I used a navy blue and white polyester print (cute, but very cheap) in case my first designer Vogue didn't go so well. The only issue I have with the finished design is that you absolutely must tack down the front cross over. It hangs open in such a huge, breast-bearing way that it's impossible not to sew it closed. 

It has a lovely silhouette. The side rouching covers whatever sins the large print doesn't.


Close up of the neckline pleats
I'll try to get some photos of it on after I've had a chance to shower and gather my wits about me. I've spent most of the morning doing laundry and getting the older of the little ones ready for preschool. I'm so not a morning person, and I move very slowly before noon. ;)

** EDITED TO ADD **

On-body photos, as promised.


Now, I just need to find some awesome red shoes!

Mar 22, 2011

Catching Up (Read: Bad Blogger!)

Good heavens, it's been a long time since I've posted! So sorry to have fallen off the radar like that. It's been a busy few months, and I haven't had much time to photograph or blog, although I have been doing some sewing.

Firstly, I have been meaning to post some photos of the gala dress actually on my body. I will know for future reference not to rely on Husband to be photo-man for events, particularly ones where I'd like shots of one of my creations. Noted. That said, I took a few snaps of myself wearing it, along with a few of the other recent completions. So, yeah, they were all taken today. No hair and make-up variety, but I did try to change up my background a bit here and there. :)


 I purchased a mask from Michael's craft store to make a matching masquerade ball mask. I covered it in the same maroon satin fabric, used stick-on jewels (which I glued for stability) and painted the designs on with glitter glue. Just one one-piece feather thingamabob hot melted onto the back and some pretty ribbons. It wasn't terribly difficult, just a bit time consuming. But I was asked a few time how I managed to have a matching dress and mask, a people were genuinely surprised and impressed when I told them I'd made both items. Not so secretly, I love that. :)


 Pardon all the wrinkles. The dress hasn't been cleaned and re-pressed since the event.

I should mention that the only change I made the original Burda design was to add bra cups sandwiched between the outer and lining layers. There was no possible way to wear an undergarment with a back that low, and even with my less than ample chesticular area, I thought it necessary to have a bit more modesty.

I did take a bit of break after I finished the dress. Although not particularly difficult, it was a time burner and the last few bits were a little fiddly. I guess I needed a little break, so I doubt I stepped foot in the studio for at least 2 weeks. Once I did finally get some mojo back, I started on McCalls 5668, which I've had cut forever and never bothered to put together. What better way to ease back in than with a project you don't even have to cut, right?  I didn't bother with a muslin since it was just a cheapo moleskin from Joann Fabrics with a pretty swirly flowery design. I find, for the most part, that I can get away with a straight-out-of-the-envelope size 12. I count myself very fortunate for this, believe me.
 
I think it turned out very nicely, and I've already worn it twice. The only thing I changed on this pattern was to add a closure. The white shirt underneath was also a completed project, but it was in the laundry, and thus I could not photograph it for this post. Promise I'll throw it in somewhere else after I can get a photo.

I threw this little skirt together in an evening. It was comes from a Butterick 5534 separates pattern and really lives up to its Fast and Easy title. It's a bit hard to see in the photos, but the fabric is a subtle blue/black plaid with a little stretch. It has to be 100% polyester based solely on the smell of it being steam pressed. I did add a full lining, which the pattern did not call for, and changed the lapped zipper to an invisible one.

 Please ignore the horrible fit of the RTW shirt I've paired it with. I won't attempt an excuse except to say that I won't wear it anymore after seeing the photos. Ick.

Lastly, sometime for the girl. Well, one of the girls. Lilly came home from preschool the Friday before St. Patrick's week in tears after her teacher told her she could wear something green on St. Patrick's day. The child who normally only allows me to dress her in pink (and the occasional purple or Disney/Nickelodeon character) was devastated that she didn't own a single green item. So, what is a sewing mom to do? We went down to Joann's, picked out some green printed cotton and flowery trim and whipped something up.  I used Simplicity 2269 from my stash.


I had to re-do the squared front sections twice so they'd lay flat. It's taken a while, I think I can safely say I've mastered that skill now. It's super cute and she was completely in love with it. Not only did she wear green on St. Patty's Day, but she wanted to wear it again to church on Sunday. Maybe I've converted Little Miss Pink to include a bit more variety. Maybe it's just because it was a dress. She still won't wear jeans with anything that isn't pink. Oh well, I guess it could be worse! :)


So, yeah. That's what I've been up to for the past two months.  This weekend I'm headed out to a cabin with some girlfriends of mine about an hour from home. It's traditionally a scrapbooking getaway, but since I've converted my friend (who happens to be the organizer) she's made into a Scrap-n-Sew. I have to haul my machine and supplies, but who cares! Imagine -- a whole weekend with no husband, no children, no distractions (well, except for the hot tub and copious amounts of alcohol), just lots of sewing (and maybe some scrapping) time! I'll be sure to take the camera to document my (hopefully) productive 2 days away. 

Until then... Happy sewing to all!

Jan 21, 2011

Gala Dress

I've been putting off my Vintage Sewalong dress in order to finish a formal dress for an event that came up last minute. Well, not exactly last minute. I knew it was going to happen (as it does every year) but I didn't have a date for the event until less than two weeks ago. The company gala. My husband's company Winter Gala, to be exact, and it's January 29th.

So, I dug out my list of formal wear patterns (of which there are very few) and chose Burda 7470.  I first noticed in the inside cover of my November Burda Style magazine. I'm generally not the 'butt bow' kind of girl, but this one just looked so elegant. I even chose a very similar color, a deep maroon.


This is as close as I could photograph of the actual color. It's really close.

The instructions on this one were actually pretty good. I've heard some horror stories of Burda instructions, but I didn't have any problems at all. Of course, I'm not a beginner, so that could make a difference. It seems like it took forever to put together, but that's mostly just because the plague hit our house (or at least it seemed that way) last week and both the little girls and I were quite under the weather. So, that meant that when I felt like sewing (which wasn't much) it had to happen late at night after the girls were in bed. It probably only really took a few hours.


Sorry for the horrible lighting. It's very late and I have harsh florescent lighting in my basement studio. And the material is shiny. I used a really delicious feeling crepe backed satin and lined it with black charmeuse. Don't look too closely at the bottom of the photo - it's not hemmed yet. I'm getting there tomorrow. Hopefully, I'll be able to take some pictures of the dress on my body, too. You won't get the full picture until after the masks are finished. That's right, I didn't mention that it's a masquerade ball! You can't even imagine how excited I am about it. I love a good theme party. This is the ultimate. A fancy hotel ballroom filled with 200 adults dressed in black tie and feathery/sequined masks. There will be copious amounts of pictures, I promise. :)

Dec 31, 2010

FINISHED! The Great Coat Project of 2010

What can I say? I'm a bit of a flapper at heart. I really didn't mean to style myself right out of the Decade of Indulgence, I swear. (But I like it!)

And wouldn't you know that the day I finish a wool winter coat it would be 50 degrees outside? I was sweating while doing my contest photo shoot! Last week... wind chill of 16. Today? Not so much. But, I'll be honest and say I MUCH prefer the unseasonable warmth. Greatly.

Here it is, all pretty and pressed on Beatrice. The only thing that bugs me is that I can't get my buttons to stay facing the same way. I had to add a bit of a thread shank, since the wool is so thick, and now they twist all over the place. I'm working on a solution. ...... Ain't she perrrrty?
 The front of the coat, in all its 20s-styled glory:
 And the back. It lays nice and smoothly without the original vertical shoulder folds. I guess those two full weeks of muslins really did pay off in the end.
 Too warm for the hat and gloves... after breaking into a sweat, we went with less buttoned-up type of look.
 And some of the front details. Did I mention before that I love the buttons? Cause if not, I really love the buttons. I mean, really really. They cost me a small fortune, but worth every penny. Now, to get them to stop spinning around! I know, I know, I mentioned that already.
*WHEW* I'm actually pretty glad that's over. It was fun, I learned A LOT of new techniques, and I got an amazing coat out of it. Overall, I'd say that I'm thrilled and excited to move on to the next project. Good luck to all of you participating in the Winter Wear Contest. Except Peter. That toggle coat is far too amazing, so I'm sending some voo-doo vibes that it doesn't win and gives the rest of us a fighting chance. ;)

Dec 30, 2010

Thinking Ahead

The coat is very nearly finished. I've gotten the wool completely hemmed and topstitched. Now, I just need to finish hemming the lining and get some buttonholes put in! I was busy trying on hats last night while out on a quick shopping trip. I'll need something new and special to go with my work-intensive coat. I think I found something that I really like, but I'll need to have the coat on when I try it, so I guess it will wait until after tonight. That's right... a few more hours and it should be complete!


And, on other thinking-too-far-ahead news, I'm excited to say that I've joined the Vintage Sew Along 2011. I even picked out my pattern... a 1930s reproduction - the Button Dress from Decades of Style.

Just look at that beautiful vintage silhouette! I will probably change the back to include fewer bows. I'm not such a bow kind of girl. It has an invisible side zipper, so I'm sure I could do away with at last the neck bow, and possibly reconfigure the waist tie to just be a belt of sorts that will open at the side seam with the zipper. Minor redrafting, I think. We'll see once I actually receive the pattern.

At any rate, I'll be looking for some amazing fabric to cook this one up with. I'm not generally into very vintage-y fashions. I work in a professional office where even a hint of 'costumey' wouldn't work. But I love the lines of the 20s and 30s, and I think this will look very classic when it's finished - just a bit reminiscent of the decade from which it was designed. Either way, I'm very excited!  I hope all of you out there who are enjoy vintage take a moment to check out the sew along and those of you already participating find something you fall in love with.

Good luck to all - in both the Patter Review Winter Wear Contest and the Vintage Sew Along 2011. More photos of the finished coat to come very soon!

Dec 27, 2010

I Can See the Finish Line!

Everyone coming down off the Christmas gifting/food/sugar high yet? It usually takes us a few days in our house to get back to normal. Today was planned to be the massive clean-up until Lilly woke up at 5:30 AM throwing up all over her bedroom floor. Poor baby. So, I let her off the hook for one more day. Santa hit our house hard, so she'll need to be in full health to tackle the mess. :)

I, on the other hand, have been working furiously on my coat for the Pattern Review Winter Wear Contest that ends on December 31st. I'm pretty sure (barring any unforeseen emergencies or snafus) that it'll be done with time to spare.... days, even.

Many thanks to my sweet hubby for taking on post-Christmas children solo for a few hours yesterday afternoon, so I could have some un-interrupted coat time. I got the sleeves set-in beautifully and smoothly using Gertie's method. Definitely worth a try if you've never used it before, especially on thick unwieldy fabrics like wool. They look great and the sleeve caps are supported, too.
 I got the lining completely cut out and the body seams finished and sewn to the facings. I had a really hard time deciding what color to use for lining. I wanted to use the Kasha flannel-backed satin for warmth so that I wouldn't have to underline. But, it only comes in a few solid colors. Hubby suggested ivory, which would have indeed looked gorgeous, but I worried about how easily white-ish colors can begin to look dirty and settled on navy instead.

It feel absolutely spectacular! If I ever make another winter coat, I'll definitely be using it again. If you could see close enough, you'd notice that where I attached lining to wool, I actually changed bobbin threads to match. I know, I'm an anal-retentive perfectionist. I can't help it. 

I do have the upper collar attached and the facings sewn to the coat (although it's still inside out). But, alas, I had to call it an afternoon when I ran out of thread. I should've known better and bought two from the beginning. I used heavy thread for the wool, so there's significantly less of it on the spool. It's okay, though, I need to get my shoulder pads, too.

The best is yet to come. After the lining is attached, I have all the hemming to do (ugh) and then... the buttons! Oh, I cannot wait for the buttons. They are, hands down, my favorite part. You'll see. I promise you'll love them, too. :)

Dec 23, 2010

Teaser

It's getting there...

Belt - finished.
Wool body shell - finished
Undercollar - pad-stitched and attached; steamed and drying overnight
Sleeves - stitched and awaiting attachment to coat
Facings - pad-stitched and read to go
Lining - in the dryer with wet towels, shrinking if it's gonna...

To do:
Cut lining
Attach sleeves
Attach facings
Sew and attach Kasha lining
Attach overcollar
Hem
Buttons and buttonholes
Admire ♥

Here's a little teaser:
Merry Christmas Eve! (okay, in 19 minutes...)

Dec 17, 2010

Persistence Pays Off

I've done it, folks! With minimal help, a little experimentation, and a few frustrated tears... I've finished my muslin. And it's actually GOOD! This makes three (I guess four if you count the alterations I did to #2) of them, all told, but the finished product seems light years from where it started. You can see the first awful mess here.

I made 4 adjustments:
1. I shortened the waist for the 'petite' sizing. I am only 5'2" afterall, so it would make sense with my petite frame that I might need a petite adjustment.
2. I trimmed just a bit off of the back side pieces at the princess seam. This took in just enough behind my arms that I don't have those unsightly vertical folds. As I started reading, I discovered that those ugly wrinkles were due to a narrow back and a bit too much fabric. A slight adjustment made those goners.
3. I added 1" (1/2" to each side) to the center back seam from the waist down. Now I have plenty of "bucket room" :)
4. I moved the bust dart up 1". The saggy look was not becoming on me; a must-fix. Moved the dart, redrew the lines and -- voila! -- a princess seam that looks like it should.

Lays smoothly and dart now ends at center bust, like it should.

Please ignore the fact that I sewed the back center seam inside out. I was too lazy to take it out and do it right. 

It's hard not to look super serious when you're trying to do self-photos. It's hard work!


Better, yes? *Whew* I guess you can learn just about anything you set your mind to! Thanks for the words of encouragement. Starting this weekend, I'll be pinning and cutting my actual fabric (gasp!), so wish me luck!

Dec 13, 2010

Lessons learned

I think I might have it, now. Thanks to the few people who offered some advice... my grandmother and Steph, in particular I have come away with an epiphany. Well, maybe several. 1. You don't have to know what you're doing to figure it out. Trial and error is the only way to learn  2. Simpler is usually better.

So, here's the gameplan after more muslin alterations.


1. Move bust dart in princess-seamed side panel up about an inch.
2. Rather than doing an SBA on an armhole princess seam, I'm simply going to remove a sliver of fabric from the center front seam - about 3/4 inch at the top, tapering to nothing at the waistline.
3. I will make the petite adjustment at the waist
4. Add a bit of bum 'wiggle room'... I think about 1/2 inch should do it just fine.

Round 3 muslin coming soon.
Related Posts Plugin for WordPress, Blogger...