Dec 31, 2010

FINISHED! The Great Coat Project of 2010

What can I say? I'm a bit of a flapper at heart. I really didn't mean to style myself right out of the Decade of Indulgence, I swear. (But I like it!)

And wouldn't you know that the day I finish a wool winter coat it would be 50 degrees outside? I was sweating while doing my contest photo shoot! Last week... wind chill of 16. Today? Not so much. But, I'll be honest and say I MUCH prefer the unseasonable warmth. Greatly.

Here it is, all pretty and pressed on Beatrice. The only thing that bugs me is that I can't get my buttons to stay facing the same way. I had to add a bit of a thread shank, since the wool is so thick, and now they twist all over the place. I'm working on a solution. ...... Ain't she perrrrty?
 The front of the coat, in all its 20s-styled glory:
 And the back. It lays nice and smoothly without the original vertical shoulder folds. I guess those two full weeks of muslins really did pay off in the end.
 Too warm for the hat and gloves... after breaking into a sweat, we went with less buttoned-up type of look.
 And some of the front details. Did I mention before that I love the buttons? Cause if not, I really love the buttons. I mean, really really. They cost me a small fortune, but worth every penny. Now, to get them to stop spinning around! I know, I know, I mentioned that already.
*WHEW* I'm actually pretty glad that's over. It was fun, I learned A LOT of new techniques, and I got an amazing coat out of it. Overall, I'd say that I'm thrilled and excited to move on to the next project. Good luck to all of you participating in the Winter Wear Contest. Except Peter. That toggle coat is far too amazing, so I'm sending some voo-doo vibes that it doesn't win and gives the rest of us a fighting chance. ;)

Dec 30, 2010

Thinking Ahead

The coat is very nearly finished. I've gotten the wool completely hemmed and topstitched. Now, I just need to finish hemming the lining and get some buttonholes put in! I was busy trying on hats last night while out on a quick shopping trip. I'll need something new and special to go with my work-intensive coat. I think I found something that I really like, but I'll need to have the coat on when I try it, so I guess it will wait until after tonight. That's right... a few more hours and it should be complete!


And, on other thinking-too-far-ahead news, I'm excited to say that I've joined the Vintage Sew Along 2011. I even picked out my pattern... a 1930s reproduction - the Button Dress from Decades of Style.

Just look at that beautiful vintage silhouette! I will probably change the back to include fewer bows. I'm not such a bow kind of girl. It has an invisible side zipper, so I'm sure I could do away with at last the neck bow, and possibly reconfigure the waist tie to just be a belt of sorts that will open at the side seam with the zipper. Minor redrafting, I think. We'll see once I actually receive the pattern.

At any rate, I'll be looking for some amazing fabric to cook this one up with. I'm not generally into very vintage-y fashions. I work in a professional office where even a hint of 'costumey' wouldn't work. But I love the lines of the 20s and 30s, and I think this will look very classic when it's finished - just a bit reminiscent of the decade from which it was designed. Either way, I'm very excited!  I hope all of you out there who are enjoy vintage take a moment to check out the sew along and those of you already participating find something you fall in love with.

Good luck to all - in both the Patter Review Winter Wear Contest and the Vintage Sew Along 2011. More photos of the finished coat to come very soon!

Dec 27, 2010

I Can See the Finish Line!

Everyone coming down off the Christmas gifting/food/sugar high yet? It usually takes us a few days in our house to get back to normal. Today was planned to be the massive clean-up until Lilly woke up at 5:30 AM throwing up all over her bedroom floor. Poor baby. So, I let her off the hook for one more day. Santa hit our house hard, so she'll need to be in full health to tackle the mess. :)

I, on the other hand, have been working furiously on my coat for the Pattern Review Winter Wear Contest that ends on December 31st. I'm pretty sure (barring any unforeseen emergencies or snafus) that it'll be done with time to spare.... days, even.

Many thanks to my sweet hubby for taking on post-Christmas children solo for a few hours yesterday afternoon, so I could have some un-interrupted coat time. I got the sleeves set-in beautifully and smoothly using Gertie's method. Definitely worth a try if you've never used it before, especially on thick unwieldy fabrics like wool. They look great and the sleeve caps are supported, too.
 I got the lining completely cut out and the body seams finished and sewn to the facings. I had a really hard time deciding what color to use for lining. I wanted to use the Kasha flannel-backed satin for warmth so that I wouldn't have to underline. But, it only comes in a few solid colors. Hubby suggested ivory, which would have indeed looked gorgeous, but I worried about how easily white-ish colors can begin to look dirty and settled on navy instead.

It feel absolutely spectacular! If I ever make another winter coat, I'll definitely be using it again. If you could see close enough, you'd notice that where I attached lining to wool, I actually changed bobbin threads to match. I know, I'm an anal-retentive perfectionist. I can't help it. 

I do have the upper collar attached and the facings sewn to the coat (although it's still inside out). But, alas, I had to call it an afternoon when I ran out of thread. I should've known better and bought two from the beginning. I used heavy thread for the wool, so there's significantly less of it on the spool. It's okay, though, I need to get my shoulder pads, too.

The best is yet to come. After the lining is attached, I have all the hemming to do (ugh) and then... 
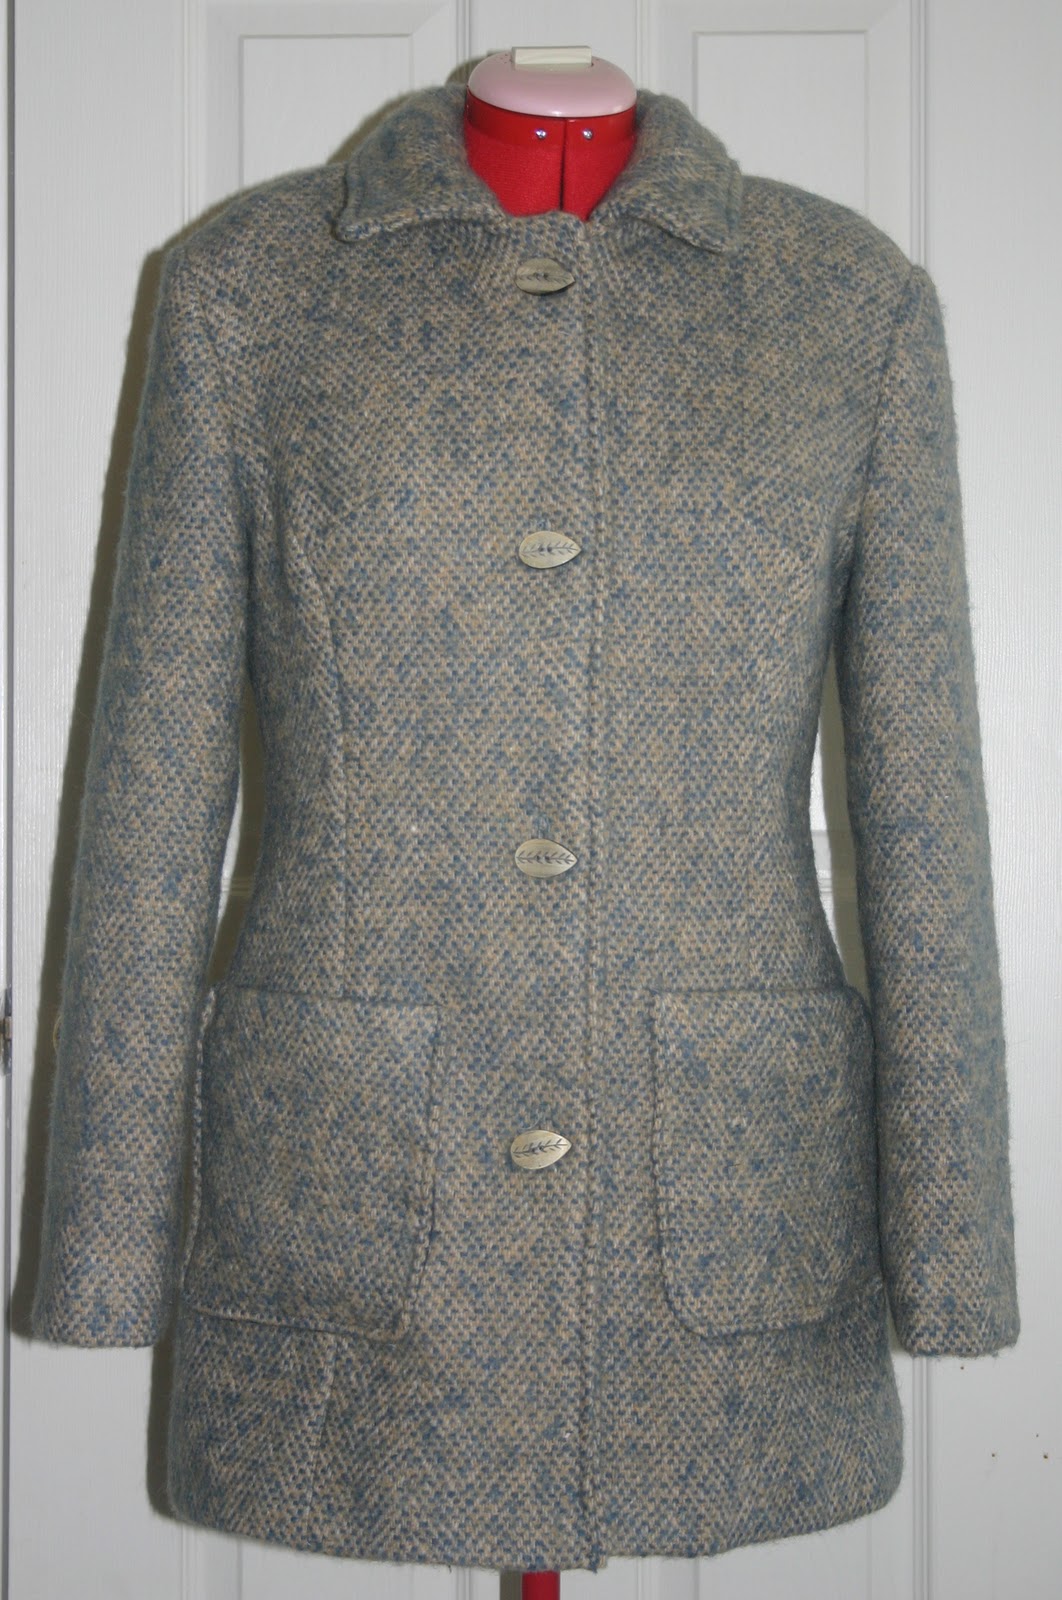
the buttons! Oh, I cannot wait for the buttons. They are, hands down, my favorite part. You'll see. I promise you'll love them, too. :)

Dec 23, 2010

Teaser

It's getting there...

Belt - finished.
Wool body shell - finished
Undercollar - pad-stitched and attached; steamed and drying overnight
Sleeves - stitched and awaiting attachment to coat
Facings - pad-stitched and read to go
Lining - in the dryer with wet towels, shrinking if it's gonna...

To do:
Cut lining
Attach sleeves
Attach facings
Sew and attach Kasha lining
Attach overcollar
Hem
Buttons and buttonholes
Admire ♥

Here's a little teaser:
Merry Christmas Eve! (okay, in 19 minutes...)

Dec 17, 2010

Persistence Pays Off

I've done it, folks! With minimal help, a little experimentation, and a few frustrated tears... I've finished my muslin. And it's actually GOOD! This makes three (I guess four if you count the alterations I did to #2) of them, all told, but the finished product seems light years from where it started. You can see the first awful mess here.

I made 4 adjustments:
1. I shortened the waist for the 'petite' sizing. I am only 5'2" afterall, so it would make sense with my petite frame that I might need a petite adjustment.
2. I trimmed just a bit off of the back side pieces at the princess seam. This took in just enough behind my arms that I don't have those unsightly vertical folds. As I started reading, I discovered that those ugly wrinkles were due to a narrow back and a bit too much fabric. A slight adjustment made those goners.
3. I added 1" (1/2" to each side) to the center back seam from the waist down. Now I have plenty of "bucket room" :)
4. I moved the bust dart up 1". The saggy look was not becoming on me; a must-fix. Moved the dart, redrew the lines and -- voila! -- a princess seam that looks like it should.

Lays smoothly and dart now ends at center bust, like it should.

Please ignore the fact that I sewed the back center seam inside out. I was too lazy to take it out and do it right. 

It's hard not to look super serious when you're trying to do self-photos. It's hard work!


Better, yes? *Whew* I guess you can learn just about anything you set your mind to! Thanks for the words of encouragement. Starting this weekend, I'll be pinning and cutting my actual fabric (gasp!), so wish me luck!

Dec 13, 2010

Lessons learned

I think I might have it, now. Thanks to the few people who offered some advice... my grandmother and Steph, in particular I have come away with an epiphany. Well, maybe several. 1. You don't have to know what you're doing to figure it out. Trial and error is the only way to learn  2. Simpler is usually better.

So, here's the gameplan after more muslin alterations.


1. Move bust dart in princess-seamed side panel up about an inch.
2. Rather than doing an SBA on an armhole princess seam, I'm simply going to remove a sliver of fabric from the center front seam - about 3/4 inch at the top, tapering to nothing at the waistline.
3. I will make the petite adjustment at the waist
4. Add a bit of bum 'wiggle room'... I think about 1/2 inch should do it just fine.

Round 3 muslin coming soon.

Dec 11, 2010

Second muslin.... almost there!

I'm almost always a size 12 in Big 4 patterns. But since this coat was meant for lighter-weight fabrics (gabardines, broadcloths and the like) I thought maybe I should cut a 14 for the muslin so that I'd have room to both line and underline my coating weight wool. So, that's where I started.

There are no photos of the first muslin - it was enormous.

So, I cut another one, in my usual size 12. Hey, if you have to cut the muslin twice, at least it's a size smaller, right? Okay, so I won't complain too much. The fit seems to be much better this time. Here are my issues - perhaps some of you seasoned tailors can give a bit of advice...

The top is far too wide, while the hips are a bit tight. You can see it here in these photos. The princess seams are much closer to my armpits than across my bust. The back is actually pretty good... when I'm properly adjusted, there's really no swayback like it sort of looks like there is.


 If I pinch in about an inch on either front side, it seems to do the trick. Would that be fixed with an SBA? I've never had to do one before, so I'm really unfamiliar with the techniques. I've been perusing some of my pattern adjustment books, but any advice would be helpful. If I take it out of the front piece, it would have to go all the way up to the shoulder... but does the back seem like it could take a shorter shoulder seam, too? I don't want the sleeves to pull or not have full range of motion. What about the hips? Should I be adding a bit to the hips and where... the side seam? Ugh, this is starting to give me a headache. I don't know how you girls do it. I guess I got spoiled with a regular size that almost never needs any adjustments. I feel like I've been inducted into some sort of club. :)


You can see it here, too, on my dressform. When the front is pulled tight, the neckline overlaps WAY farther than it should. There's no lapel - or at least there's not supposed to be. And the closer to the bottom you get, the farther the spread. The waist fits perfectly - should I be trying to grade between 3 sizes!? Yeah, there's that headache again.

HELP! Some advice or ideas from the pros (or at least those slightly more versed in pattern alteration) would be great while I read every alteration book I can find.

Oh yeah, and a gratuitous photo of my babies. :)

Dec 3, 2010

Temporary Replacement

My sad, empty sewing machine table... it's lonely without Helen!

It's been weeks since I've had either the time or the energy to do any sewing. So, wouldn't you know the day I finally get motivated enough to cut and attempt to sew something, my machine would break. Oh, Helen! Why now? I'm beginning to understand the benefits of hoarding multiple machines. I feel I should invest in a spare... or two... or five. ;)

It's nothing major (I think), only the zig-zag function isn't working properly. It seems that my needle bar won't stay put, nor will it zig on command. Or zag, for that matter. It's in the repair shop as we speak, and I'm told that a tune up should do the trick, with the possibility of a small part replacement. I guess we shall see! But until the call comes, I figured I was just stuck without a machine. AH! But then I remembered.... my mother used to sew! She still has an old machine, and she's surely not currently using it. So, when my folks came over for movie night last night she brought it along. This lovely old gal will be helping me work through my coat muslin this week until my sweet Helen comes home again.
Ain't she a beaut? It's a Singer Merritt 3013 - old as the hills and still chuggin'! I'll have to give it a good dusting and thorough oiling, but it'll get me through. Thanks, Mom!

And speaking of.... My gorgeous wool coating from Mood is at the cleaners being steam pressed, the buttons, hair canvas, and Kasha flannel-backed satin lining are on the way and I've gotten my muslin all pinned.
 I've entered myself in the Pattern Review Winter Wear contest and I'm going to make it happen with or without my sewing machine! Wish me luck! (I think I might need it)
Related Posts Plugin for WordPress, Blogger...